Placing cameras on the camera VLAN
Your camera VLAN is where the privacy benefit of local NVR actually lives. Cameras on an isolated VLAN can't reach the internet, can't reach other devices on your network, and can only be accessed by the NVR. This guide covers how to connect a camera to that VLAN and confirm Frigate can still reach it.
The camera itself doesn't need to know anything about VLANs. You configure isolation at the switch, not on the camera. From the camera's perspective, it powers on, gets a DHCP address, and starts streaming. The switch and firewall handle the rest.
Before you start
This guide assumes:
- Your camera VLAN and firewall rules are already configured. See Setting up a camera VLAN in OPNsense or Setting up a camera VLAN on other routers and switches
- Your switch ports are configured for the camera VLAN. See Setting up a camera VLAN on TP-Link switches if you're using a TP-Link switch
- Frigate is running and the camera's feed is already working, or you're adding a new camera for the first time
Throughout this guide, example IP addresses are used for clarity. Replace them with the addresses from your own network:
- NVR (main LAN):
192.168.1.100 - Router / OPNsense:
192.168.1.1 - Camera VLAN subnet:
192.168.10.0/24 - Cameras (camera VLAN):
192.168.10.101,192.168.10.102, and so on
Step 1 — Connect the camera to a camera VLAN port
Plug the camera's Ethernet cable into a switch port that is configured as untagged on your camera VLAN. On TP-Link managed switches, that means the port has the camera VLAN as its PVID and is listed as untagged for that VLAN in the port configuration.
The camera's link light should come on within a few seconds of connecting. PoE cameras will also power on at this point if they're receiving power from the switch.
You don't need to configure anything on the camera to make the VLAN work. The switch handles VLAN assignment based on which physical port the camera is connected to.
If you're moving a camera that was previously on your main LAN, unplug it from its current port and reconnect it to the camera VLAN port. The camera will request a new DHCP address from whichever interface serves that port.
Step 2 — Confirm the camera received an IP on the camera VLAN
Once the camera powers on and connects, it requests an IP address via DHCP. Your router or OPNsense should assign one from the camera VLAN's DHCP range.
In OPNsense, open Services, then Dnsmasq DNS & DHCP, then Leases. Look for a new lease that appeared recently with an IP in the 192.168.10.x range. If you know the camera's MAC address, match it to confirm. Note the IP address — you'll need it in the next step.
If no lease appears after a minute or two:
- Confirm the switch port is set to the correct VLAN and has the right PVID
- Confirm DHCP is enabled on the camera VLAN interface in OPNsense
- Check that the camera is powered on and the cable is seated firmly
- Try a different cable or port if the link light isn't on
See Camera feed not showing in Frigate if the camera still can't get an address after checking these.
Step 3 — Assign a static DHCP reservation
Frigate connects to each camera using the IP address in config.yml. If the camera's IP changes after a DHCP lease renewal, Frigate will lose the feed. Locking the IP with a static reservation prevents that.
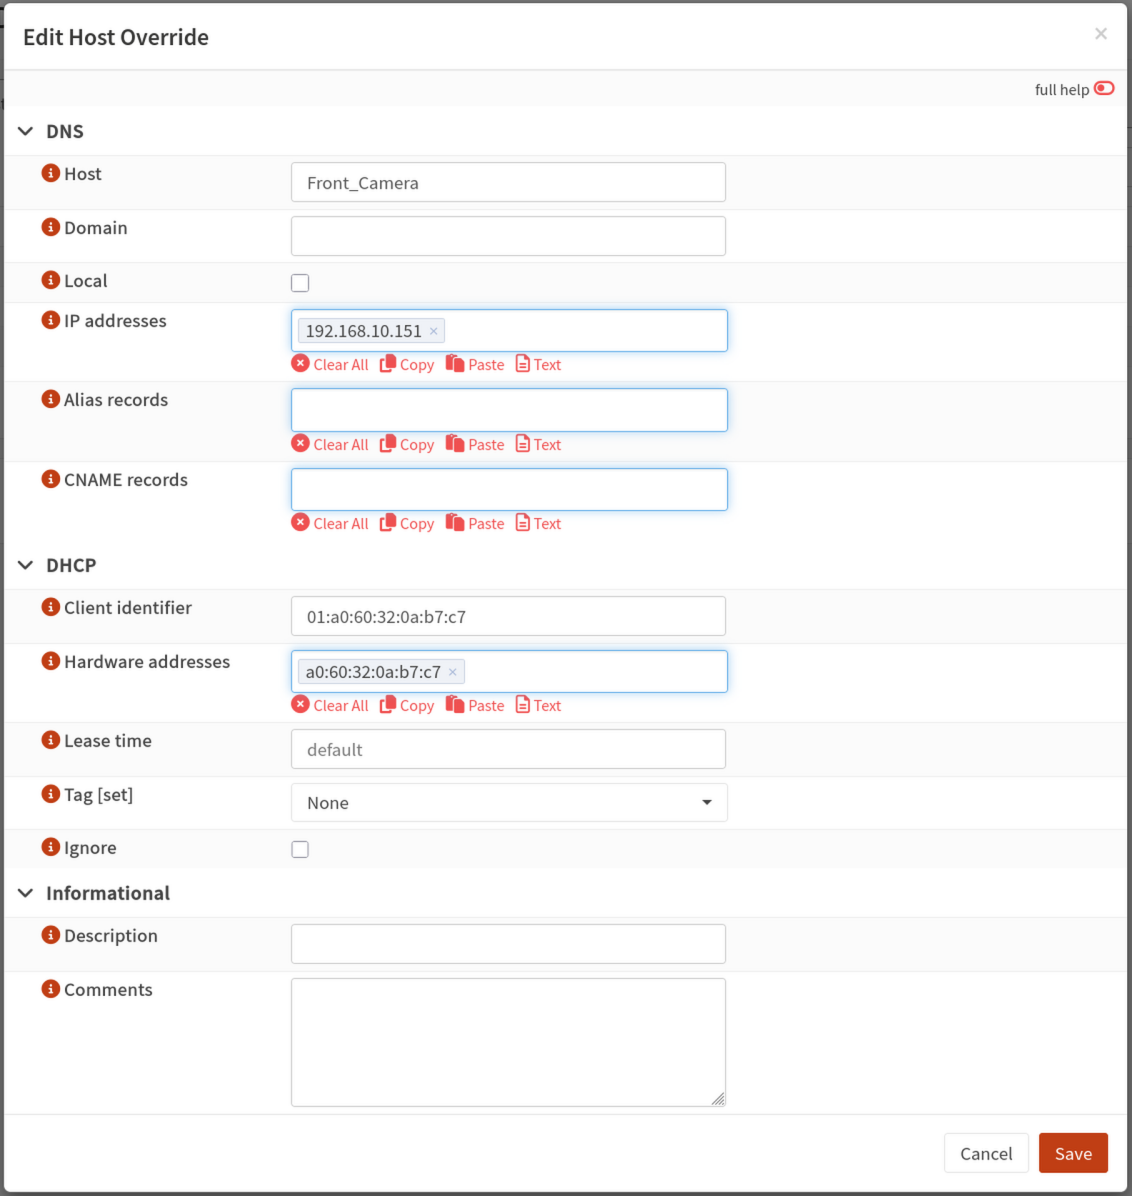
In OPNsense, open Services, then Dnsmasq DNS & DHCP, then Leases. Find the camera's lease and click the + button next to it. This opens the Edit Host Override form with the MAC address and IP already filled in.
Fill in any remaining fields:
- Host: a short name you'll recognize, for example
Front_CameraorDriveway - IP addresses: the IP the camera currently has, or a different one in the VLAN's range (pre-filled from the lease)
- Hardware addresses: the camera's MAC address (pre-filled from the lease)
Click Save.
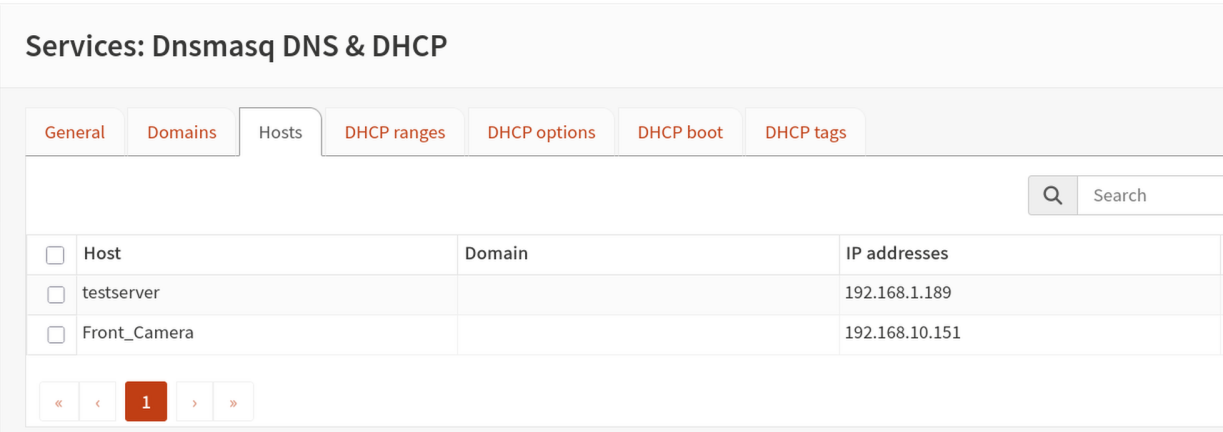
After saving, the reservation appears in the Hosts tab. The camera will keep this IP address on every reconnect going forward.
If you want the static IP to take effect immediately rather than waiting for the current lease to expire, power-cycle the camera.
Step 4 — Verify Frigate can reach the camera
With the camera on the VLAN and a fixed IP assigned, confirm the NVR can still reach it.
SSH into the NVR and ping the camera's IP:
A response confirms network connectivity. If ping fails, check the firewall rule that allows the NVR to reach the camera VLAN. That rule should allow the NVR's IP (192.168.1.100) to reach the camera VLAN subnet on ports 554, 8554, 80, 443, and 3702. See the OPNsense camera VLAN guide for the expected rule layout.
Also test the RTSP port:
A successful connection means Frigate will be able to pull the stream once the config is correct.
Step 5 — Update config.yml if the IP changed
If this camera was previously on your main LAN, or if the DHCP reservation assigned a different IP than what was in your Frigate config, update config.yml with the new address.
Open config.yml on the NVR and find the camera's entry. Update the IP address in each stream URL:
cameras:
  front_door:
    ffmpeg:
      inputs:
        - path: rtsp://admin:YOUR_PASSWORD@192.168.10.101:554/cam/realmonitor?channel=1&subtype=1
          roles:
            - detect
        - path: rtsp://admin:YOUR_PASSWORD@192.168.10.101:554/cam/realmonitor?channel=1&subtype=0
          roles:
            - record
Replace 192.168.10.101 with the camera's actual IP on the VLAN. The username, password, and stream path stay the same.
Restart Frigate to pick up the change:
Step 6 — Confirm the feed in Frigate
Open the Frigate web interface and check that the camera tile shows a live image. If the feed was working before the move, it should resume within a minute of Frigate restarting.
Check the logs if the feed doesn't appear:
A "Connection timed out" or "No route to host" error points to the firewall rule. A 401 Unauthorized error means the credentials are correct but there's an authentication mismatch. See Camera feed not showing in Frigate for a step-by-step breakdown of each error type, including a dedicated section on feeds that stop working after moving a camera to the VLAN.
What normal looks like
When placement is complete:
- The camera tile in Frigate updates with a live image
- The camera's IP in OPNsense DHCP leases matches what's in
config.yml pingfrom the NVR to the camera succeedsdocker logs frigatedoesn't show connection errors for that camera
The camera's web interface is no longer reachable from your laptop or phone, which is the expected result of VLAN isolation. If you need to access it for configuration, see Accessing cameras from your computer for how to add a temporary firewall exception.
Where to go from here
- Setting up recording zones and motion detection, once your cameras are in place and feeds are stable
- Adding your first camera to Frigate, if you're still working through initial camera configuration
- Camera feed not showing in Frigate, if a feed stops working after the move
LAN Foundry customer support
The guides on this site are free for everyone, whether you bought hardware from us or not. If you've worked through this guide and a camera still won't get an address or Frigate can't reach it after the move, there are a few more places to go depending on your situation.
If you're running your own hardware
The OPNsense forums and the Frigate community are good resources for firewall rule and VLAN questions that go beyond what this guide covers. Bring your OPNsense firewall rule configuration and the output of docker logs frigate --tail 50.
If you purchased an Argus system from LAN Foundry
Visit lanfoundry.com/support for support options and how to submit a ticket.
When you open a support request, include:
- The camera's name, model, and which switch port it's connected to
- The IP address the camera received (or that it's not receiving one)
- Whether
pingfrom the NVR to the camera succeeds - The output of
docker logs frigate --tail 50 - Any recent changes to switch configuration, firewall rules, or
config.yml
The more context you provide, the faster we can pinpoint the issue. If your system is still within its warranty period, check your purchase documentation for what coverage applies.
Was this page helpful?
Found something wrong or out of date? Let us know below, or open a GitHub issue if you have a GitHub account.